• When you click on links to various merchants on this site and make a purchase, this can result in this site earning a commission. Affiliate programs and affiliations include, but are not limited to, the eBay Partner Network.

RTE IVR4 dash limiter

vso737

Well-Known Member
Joined
Oct 6, 2013
Messages
180
Reaction score
32
Location
California
It seems like the IVR4 limiter does NOT go all the way into the dash.

¿ Do the prongs have to be modified to make them seat all the way down ?

It's been a while since I installed it. I guess I can try and find the stock limiter that I removed and see how long the prongs are.

I'm trying to get my fuel gauge to work.

Any suggestions greatly appreciated.

LG,
Mike
 

ACME A12

Plaid Sport Coat Wearing Moderator
Staff member
Joined
Nov 4, 2008
Messages
13,694
Reaction score
857
Location
New Port Richey, FL
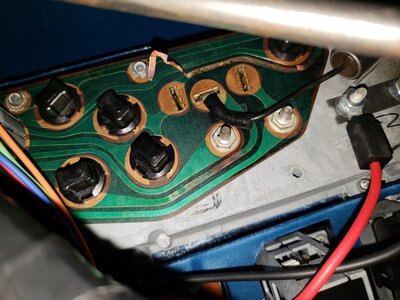
Mine did not sit down all the way either...and caused a big problem. Apparently during my assembly of the dash I must have "bumped" the VL and it got cockeyed. It seems like the Voltage Limiter case shorted either the 12 or 5 volt output to the ground trace where it is broken in the pic below. Needless to say I had to replace the PCB. I compared the way that the original VL fit and trimmed the connections on the new one accordingly. I then made sure that the VL was sitting as square as possible upon reassembly and have had no issues since. KNOCK ON WOOD.
20200624_074040_resized (2).jpg
 

vso737

Well-Known Member
Joined
Oct 6, 2013
Messages
180
Reaction score
32
Location
California
I have a feeling that they are not just longer but wider as well. I did NOT like the way it went on but I have been driving with it this way for over a year and the gauge was working.............only registered 3/4 with a full tank but working. Now, it is not working at all and I have the new sending unit installed.
I'm going to try and see if I can find the original unit and try to duplicate the legs.
Thanks for the info.................
LG,
Mike
 

Roadcuda

Well-Known Member
Joined
Sep 10, 2008
Messages
10,547
Reaction score
297
Location
Rocky Hill, Ct
Is your sending unit an original or reproduction. The reproduction units for the most part have not been reading accurately. I went through 2 or 3 on my car before I gave up and installed a Meter Match. https://www.technoversions.com/MeterMatch.html. It's easy to install, just find the wire from tank to the gauge. It's in the wire bundle that runs up behind driver side kick panel. You cut the gauge wire, hook each end to the meter and add a power and ground wire. Then you can adjust the gauge reading to the sending unit through it's whole range of movement.
 

vso737

Well-Known Member
Joined
Oct 6, 2013
Messages
180
Reaction score
32
Location
California
Hi Roadcuda, thanks for the info. Below is a writeup I did on the tank leaking gas-
"As I suspected, the sending unit was the culprit. It appears that the ground seal on the sending unit became brittle and part broke off causing it to leak pretty good.
Lowering the rear axle helped tremendously. The old gauge reads 53 ohms at full stop and 5.4 at the empty spot. The NEW unit reads 76.5 at the full stop and 10 at the empty mark.
When I parked the car, the gauge was all the way down after showing a FULL read immediately after filling the tank.
Started the car to see if I find any leaking overnight. So far, five hours later and NO leak. The gauge is still at the bottom mark. I will be doing some testing tomorrow to see if it is the gauge or bad wiring or just the fact I only put back five gallons of gas into the tank. Right now I'm ONLY worried about it NOT leaking.
I read a lot on the fact that the replacement lock rings are NOT as thick as the original. Well, the one I just installed is thicker than the one I took out.
Attached are some pictures of the before and after."
________________________

The gauge does NOT work since I installed the new sending unit.
I purchased the MeterMatch over a year ago and have NOT installed it yet.
I have replaced the ignition switch due to intermittent working of the fuel gauge. It took care of the issue when I replaced the ignition switch. I have a feeling it is either the prongs on the IVR4 limiter being too long and the unit NOT seating all the way down or the ignition switch again not supplying juice to the panel.
I have not had a chance to work on it due to doing other work on my Model A hotrod.

The old sending unit had the MOPAR logo stamped on it. Looks like the replacement one I installed is better made................
So I went from a 3/4 reading when full; to a leaking gas tank; and now a fuel gauge that does NOT work at all..........................LOL

Thanks again for all the info.................
LG,
Mike
 

69hemibeep

Sponge Bob Square Wheels
Joined
Sep 10, 2008
Messages
22,217
Reaction score
2,455
Location
AZ Desert,
The limiter makes contact near the top no reason to try and jam it in there.
 

vso737

Well-Known Member
Joined
Oct 6, 2013
Messages
180
Reaction score
32
Location
California
The limiter makes contact near the top no reason to try and jam it in there.
I had a chance to work on the RR today. I compared the old limiter to the new one and the prongs are exactly the same width and length. I just did not have it plugged all the way in.
I tested the sender with the wire removed and the gauge moved all the way to full. I then installed some good grounds at the sender.
My next step is to test for juice at the gauge. I suspect that the problem is going to be the ignition switch. I will follow-up once I perform those tests.
LG,
Mike

P1130407.JPG

P1130408.JPG

P1130409.JPG
 

Russ69Runner

Well-Known Member
Joined
Aug 4, 2016
Messages
7,787
Reaction score
3,337
Location
Lake Wales Fl.
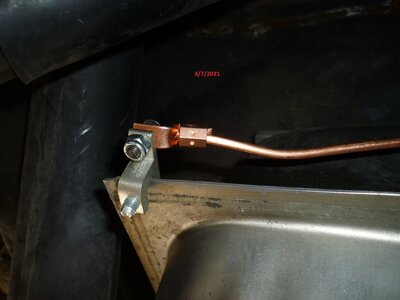
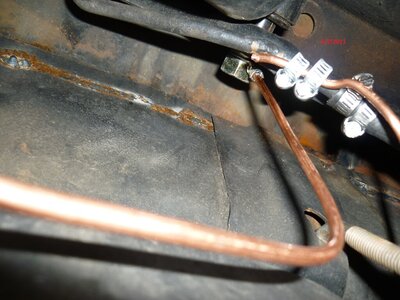
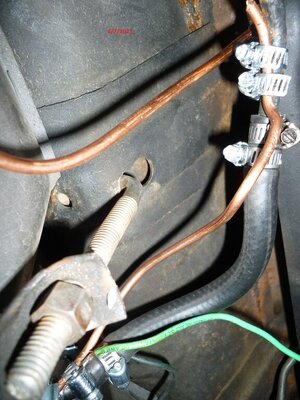
Where is the ground strap that goes between lines. Put my strap on and ran a number 10 wire like you have. In building my runner ran a number 6 wire from front to back of car and landed grounds to tail light buckets-rear back up lights- tag light. Service ground's to frame in different place's also. Hope when putting power to car this week every thing will work properly. Here problem's with the sending unit not registering properly at the gauge. Some have put a device in so it will read right. Their is an old forum on this. Think the device is about 70 buck's.
 

vso737

Well-Known Member
Joined
Oct 6, 2013
Messages
180
Reaction score
32
Location
California
Where is the ground strap that goes between lines. Put my strap on and ran a number 10 wire like you have. In building my runner ran a number 6 wire from front to back of car and landed grounds to tail light buckets-rear back up lights- tag light. Service ground's to frame in different place's also. Hope when putting power to car this week every thing will work properly. Here problem's with the sending unit not registering properly at the gauge. Some have put a device in so it will read right. Their is an old forum on this. Think the device is about 70 buck's.
ANS:
You are looking at it. The ONLY thing between the two hose clamps fastening the copper wire and the one hose clamp at the bottom is the FUEL hose. This contraption replaces the snap on flat metal strap. I purchased one of those straps a few years back and it was way too short.......it was not long enough to clear the fuel hose. This is a much better clamping/secure method.
The green ground wire goes from the sending unit fuel line directly to the chassis. I then also grounded the tank to the chassis as shown in the pictures.

I purchased a "Maximeter" a while back and have not installed it yet. Yes, it is suppose to allow one to adjust the resistance to match the sender to the gauge.

I still think I'm NOT getting juice to the gauge. Will check out the fuse panel and ignition switch tomorrow. Hope to have some closure on this gague issue soon.

I might also remove the LH quarter panel to investigate the gauge wire leading to the sending unit. Maybe clean out the connector.
LG,
Mike
 

ValR

Member
Joined
Mar 8, 2021
Messages
15
Reaction score
9
Mine did not sit down all the way either...and caused a big problem. Apparently during my assembly of the dash I must have "bumped" the VL and it got cockeyed. It seems like the Voltage Limiter case shorted either the 12 or 5 volt output to the ground trace where it is broken in the pic below. Needless to say I had to replace the PCB. I compared the way that the original VL fit and trimmed the connections on the new one accordingly. I then made sure that the VL was sitting as square as possible upon reassembly and have had no issues since. KNOCK ON WOOD.
View attachment 34037
Wow i needed this pic. My condenser wire has been hanging free and i didnt know which pin it went to on the limiter. So yer pic shows it on the center pin, so thats correct?
 

vso737

Well-Known Member
Joined
Oct 6, 2013
Messages
180
Reaction score
32
Location
California
Wow i needed this pic. My condenser wire has been hanging free and i didnt know which pin it went to on the limiter. So yer pic shows it on the center pin, so thats correct?
_________________
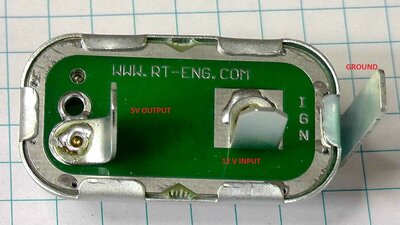
Not my picture. But yes, the CENTER pin is the 12V input; the LEFT pin is for the 5V OUTPUT and the far right is the GROUND. If you are using the SOLID STATE limiter, there is NO need to run the condensor. Attached is a picture of the solid state limiter I upgraded to.
LG,
Mike

RTE IVR4 SOLID STATE LIMITER.jpg
 
Last edited:

ValR

Member
Joined
Mar 8, 2021
Messages
15
Reaction score
9
_________________
Not my picture. But yes, the CENTER pin is the 12V input; the LEFT pin is for the 4V OUTPUT and the far right is the GROUND. If you are using the SOLID STATE limiter, there is NO need to run the condensor. Attached is a picture of the solid state limiter I upgraded to.
LG,
Mike

View attachment 34081
Roger! Yeah i still have old one. Thanks alot!
 
Back
Top