• When you click on links to various merchants on this site and make a purchase, this can result in this site earning a commission. Affiliate programs and affiliations include, but are not limited to, the eBay Partner Network.

Installing '70 RR air grabber assembly to the hood

WWheeler

Well-Known Member
Joined
Mar 7, 2019
Messages
160
Reaction score
123
Location
Dallas
Getting ready to assembly the entire air grabber assembly and then install the box on the hood. Question is what sequence do you do this in order to install decals on the side of the lid off the car. It would be difficult to install these triangular decals if the lid is on the hood. The clevis pins are hidden behind decal on the lid and must be installed first with the arms fitted at the same time. Maybe I missing something?

Many years ago I install a similar A/G assembly and simply cut the decal so the clevis pins could be fitted later. Worked just fine but would rather not do this again.

Thanks.
 

WWheeler

Well-Known Member
Joined
Mar 7, 2019
Messages
160
Reaction score
123
Location
Dallas
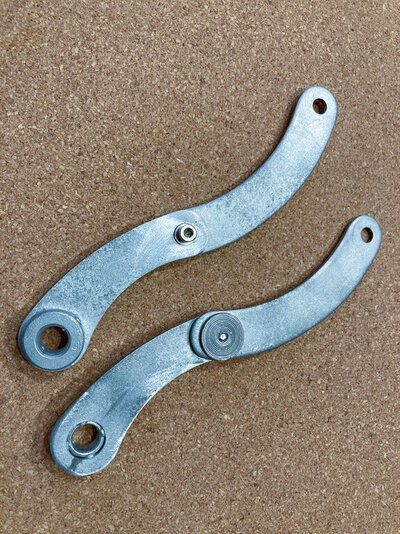
I decided to separate the two sections of the arms. Now I can install the one on the lid with the pin and put the triangular decal on with out cutting. The other will be installed on the shaft and be installed with the completed housing on the hood. How to rejoin the arms at the pivot point? I ground off the smashed end of the rivet and the separated the arms. I then drilled and tapped a 4mm through hole in the rivet. Using a 4mm SS Allen head screw and a SS wave washer, I reattached the assembly. I used 4mm because that is what I had laying around. The Allen head of the screw looks similar to the smashed end of the rivet. A #6 screw would work as well. I can now zinc plate the pieces while they are apart. Good as new and even better because I can take it apart if need be. Will probably use Loctite to secure the screw.


A-G lid arms.jpg
 

WWheeler

Well-Known Member
Joined
Mar 7, 2019
Messages
160
Reaction score
123
Location
Dallas
Thanks! Looks like they just had a solid rivet and smashed one end. That end also flared out inside one of the arm holes and secured it also. Just an inexpensive way to do it and they never were concerned with restoration. Pretty typical with many parts on these cars. If doesn't need to come apart for maintenance or replacement, it was usually fastened permanently and the cheapest way possible.
 
Back
Top